Welcome, applauded by crochet
Glad it is in this site of patterns in crochet, and see this beautiful blanket made with squares of shells. This pattern is quite old but very beautiful. The crochet blanket is very interesting for those looking to decorate a bed or maybe make a sofa blanket this example is perfect. More for those who seek comfort for their baby is also a bright blanket. The walkthrough will be available for free below and I hope you like the way this beautiful work is done. Do not worry if you are starting in this art that is crocconeguemos we learn beautiful fascinating works.
Crochet pattern lovers are very important to you here, because through you it generates a desire to continue helping with patterns in crochet, share and comment enough to have more strength to continue.
I found this graph that will give an idea of the point construction and also the model:

Special
stitches:
V-stitch Cluster (these are done in the sc in
the middle of the previous rounds shell clusters – these are only done in the 4
corners of the blanket) – dc, ch1, dc, ch3, dc, ch1, dc.
Shell
Cluster – In the v-stitch clusters from the previous row – 7dc in first ch1
space, sc in ch3 space, 7 dc in next ch1 space – shell cluster made.
Shell – 7
dc in the specified chain space
V stitch –
dc, ch1,dc

Set up
rounds:
Row 1: Ch4,
*1dc in 4th chain from hook, ch1 repeat from * 6 times, slip stitch into the
3rd chain of the starting ch4 (this counts as the first dc in the round).
Row 2: Ch1,
sc in first ch1 space (this is the 4th ch of the beginning ch4), *7 dc in next
ch1 space, sc in next ch1 space) repeat from * 3 times, 7 dc in next ch1 space,
slip stitch to first sc of the round. (You should have 4 shells, and 4 sc
total)
Row 3: Ch4,
all in the same stitch work (1 dc, ch3,1dc, ch1, 1dc – starting v-stitch
cluster made), *ch 5, skip the next 7 dc, in the next sc work v-stitch cluster,
repeat 2 more times for a total of four v stitch clusters, chain 2 and dc into
the 3rd chain from the first v-stitch cluster .
Row 4: 7 dc
in next ch1 space, sc in ch3 space, 7 dc in next ch1 space (shell cluster made)
– sc into the 4 th (middle dc) of the shell of the previous row – make sure the
sc goes around the ch5 – securing the ch5 down – Shell cluster in next v-stitch
cluster, sc into the the middle dc of shell from below – 3 more times.
Row 5: ch4,
dc in same sc (first v-stitch on first side of square made),ch5, v-stitch
cluster into the sc of next corner shell cluster, ch5,* v stitch into the next
sc between shell clusters (vstitch on 2nd side of square made)ch5, v-stitch
cluster into the sc of next corner shell cluster, repeat from * 2 more times,
ch2 and dc into the 3rd chain from the starting chain 4 of the round.
Row 6:
*Shell into the first v-stitch, sc into the middle dc of the shell below, shell
cluster in the next vstitch cluster, sc into the middle dc of the shell below,
repeat from * 3 more times
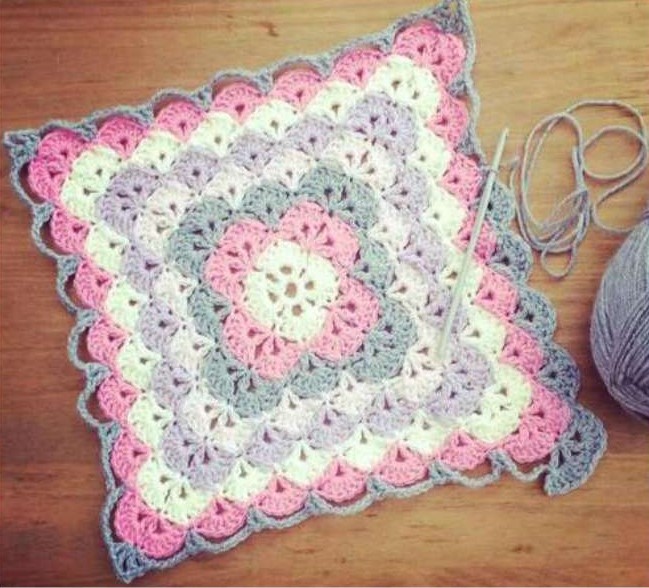
Set up is
complete – your piece should look like this:
For the
body of the piece you will repeat these two rows:
Row7: Ch4,
dc in same sc (counts as first v-stitch), (ch5, v-stitch in the next sc) to
first corner, ch5, vstitch cluster in the corner, *ch5 v-stitch in sc between
next shell, ch5 (do this to the next corner shell cluster), v-stitch cluster in
middle sc of corner shell cluster, repeat from * until you have done a shell
cluster in the 4th corner. Then – ch5 and v-stitch into each of the sc between
shells until right before you get to the first v-stitch of the round, ch2 and
dc into the 3rd chain of the first v-stitch. (On row 7 this will be right after
the fourth corner cluster, but on subsequent rows there will be more before you
get to your starting v-stitch).
Row 8: *7dc
in next v-stitch, sc ** into the middle dc of the shell below, repeat from * to
** til you get to the next corner v-stitch cluster – shell cluster in v-stitch
cluster, sc in middle dc from row below*** repeat * through *** 3 more times -
to end of round.
Repeat
these two rows, ending on a row 8

Follow the video tutorial with all the construction and explanation, I hope to see a lot of work like this on the internet, good work:


Nenhum comentário